As a self-employed person and growing entrepreneur, I make sure that I make the best possible use of all my available resources. Hence, I could not just use Tailwind for Pinterest Marketing and leave Instagram out of it!
Just in case you are not aware, Tailwind is an official partner of Pinterest and Instagram.
In one of my posts I shared with you how to use Tailwind for massive Pinterest growth. If you haven’t checked that already, find it here.
Click here to start your free Tailwind account.
This post contains Affiliate links. If you do sign up for Tailwind I would love it if you used my affiliate link by clicking here! (if you do sign up with this link I will receive a wee commission at no additional cost to you!) What that means is if you click on any of the links and make a purchase, I get a commission at no extra cost to you.
If you do, I thank you for your purchase. I was compensated to create this content.
TAILWIND CREATE has made is very easy and fast to create amazing Pins for Pinterest. Check this post to know more about Tailwind Create and how to use it.
Tailwind for Instagram
Now Instagram is indeed a hugely popular and widely used social media platform. That makes it a great opportunity for businesses, entrepreneurs and bloggers alike for substantial growth.
Instagram, being a social media platform, is more about connecting and engagement.

So you already have amazing content to share on Instagram but you always need a few extra hours in the day to manage with scheduling your content in the best possible way?
That’s so me and I totally get you!
People (except those who are working at it) seldom realize how much of hard work and time goes into consistently putting those Insta-worthy gorgeous pictures with amazing captions and just the right number of carefully chosen relevant hashtags to go with the image!
A tool that has really helped me get this sorted is- Tailwind.
Tailwind has been immensely helpful in creating amazing Pins for Pinterest and scheduling them.
Now I am putting it to use for creating and scheduling my Instagram posts.
Update
Now, you can also create and post Instagram posts, stories and Facebook posts with Tailwind Create.
Isn’t that amazing! That saves a lot of time, energy and effort that goes into creating content and sharing content on different platforms.
You don’t need to start from scratch as Tailwind Create helps you with lots of ideas to begin creating your designs.
Find out how-
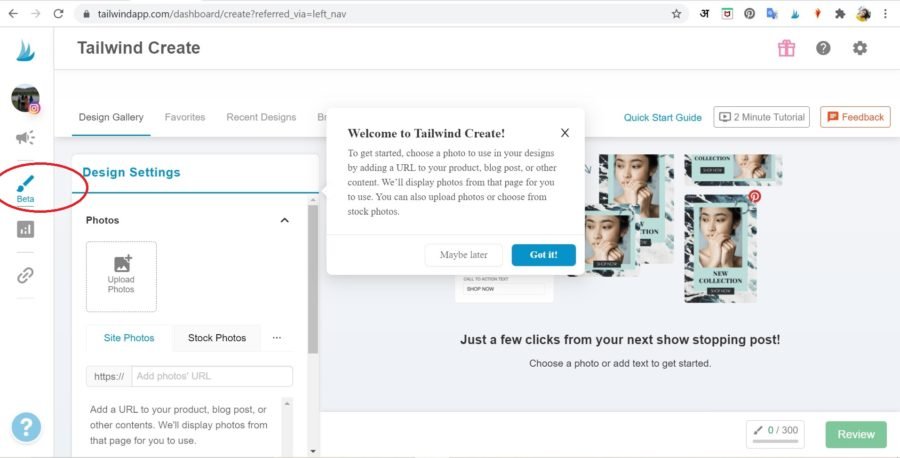
First of all, login into your Tailwind account. Click on the Paint brush on the left column of your screen (as shown in the image below).
You will be shown this screen and the small dialogue box ‘Welcome to Tailwind Create’. Click on ‘Got it’.
Now you have this screen with all your tools on the left hand side and the results or what you create, will be displayed on the right hand side.
You can see the tabs -Design Gallery, Favorites, Recent Designs and Brand setttings.
Click on Design Gallery as that is where most of the action happens.
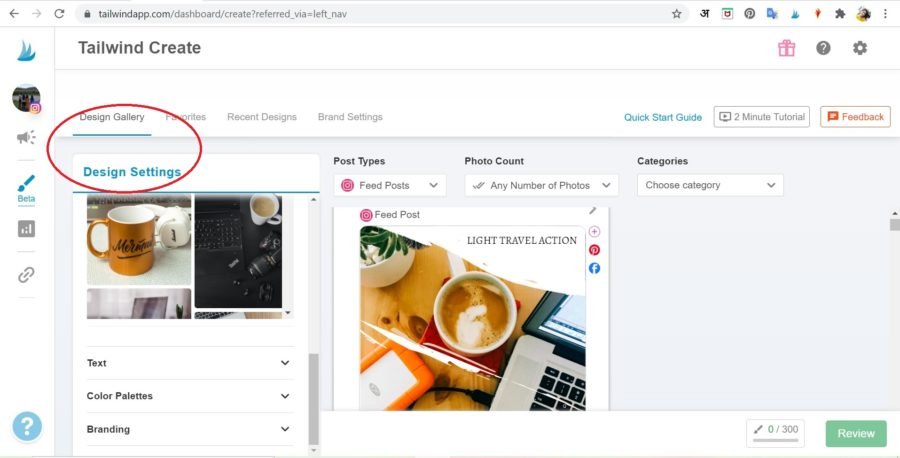
Here, you can upload photos from your system, site or use stock photos as required. Under ‘Text’, you can add the Title, CTA (call to action) and select font.
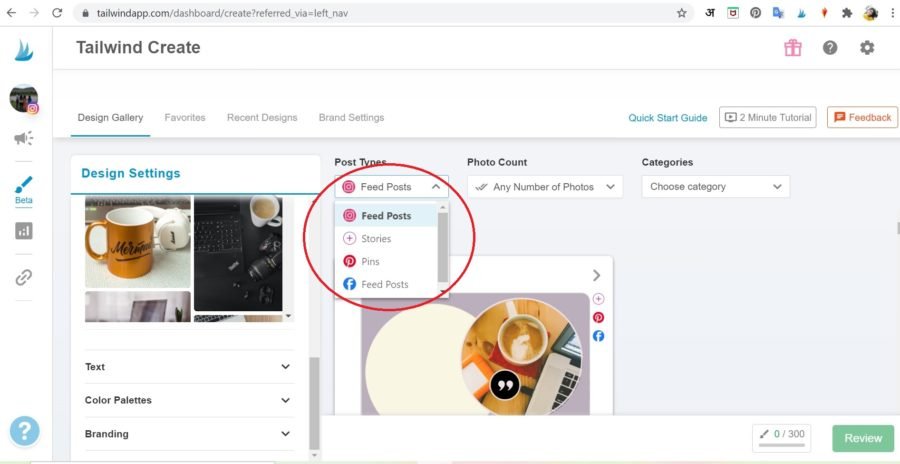
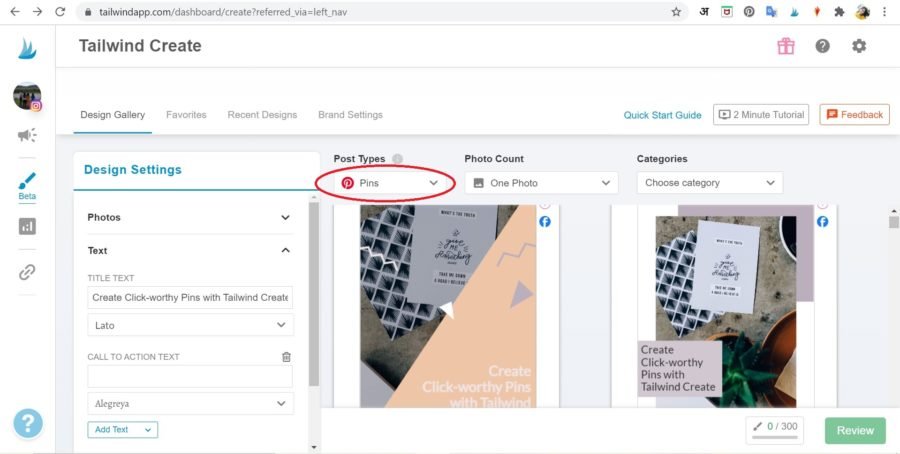
As shown in the image above, you can select from ‘Post Type’. What do you plan to create- Instagram feed post, stories, pins for Facebook post?
Depending upon the image you select and the post type, you will be shown the results there (as shown in the images below).

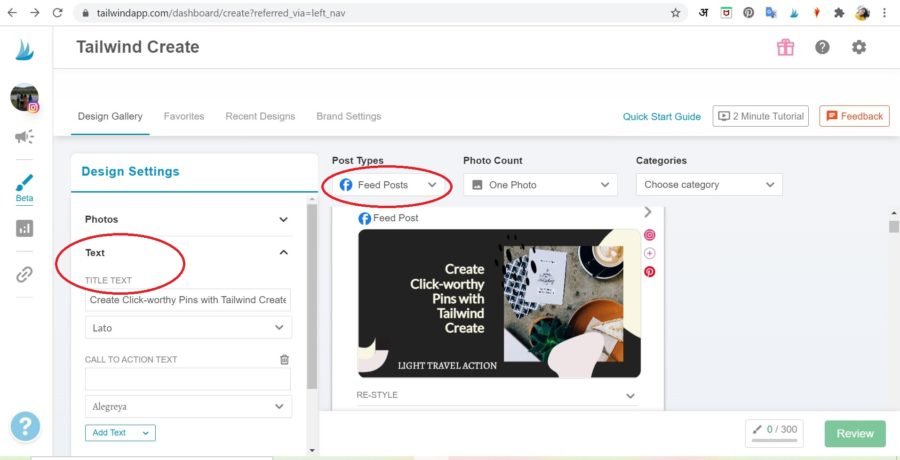
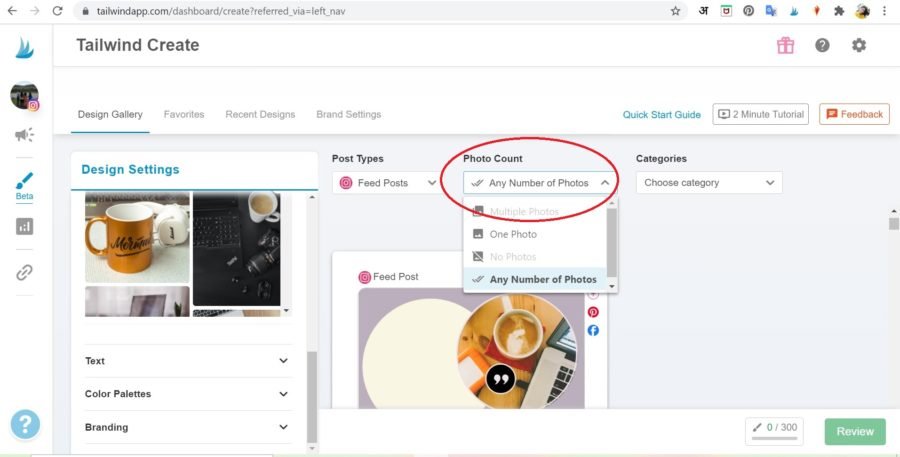
As shown in the image below, you can choose any number of photos for your post.
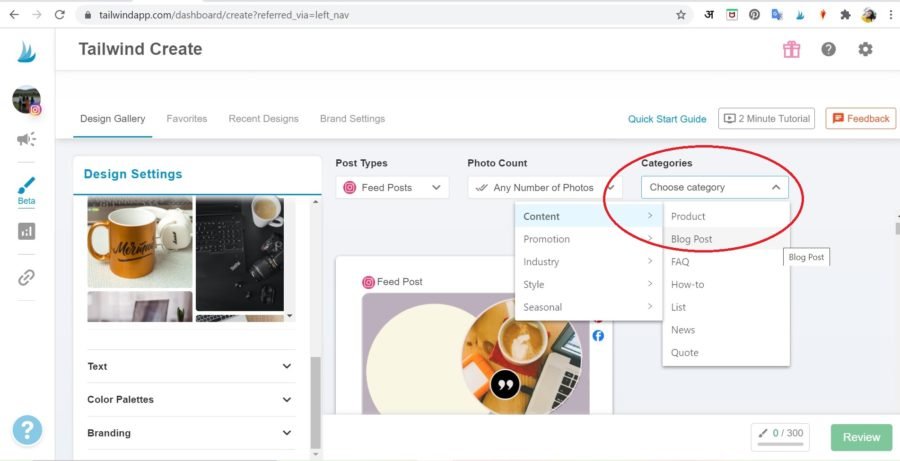
You can also choose the Categories for your post from the drop down menu (as shown in the image below). I have selected Content and Blog post.
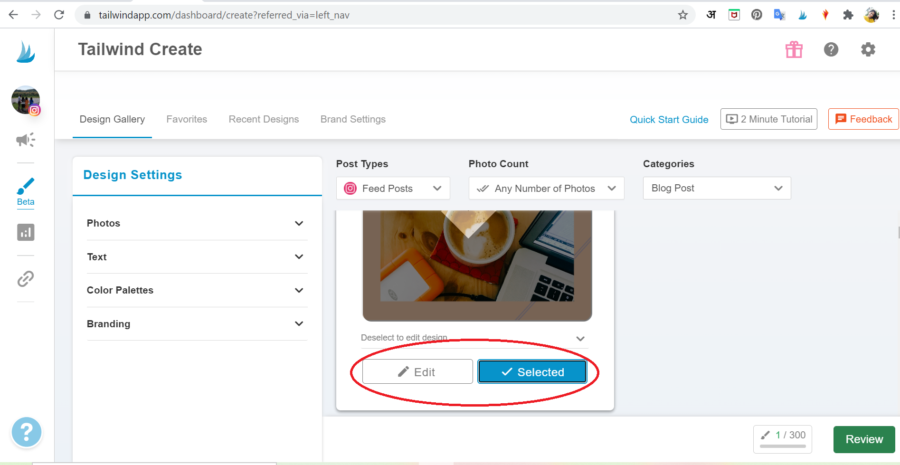
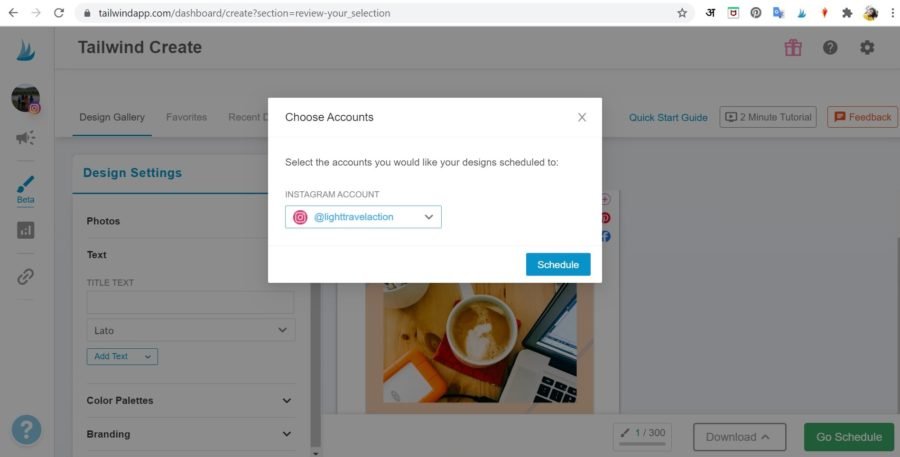
You will be shown many designs that you can select from and edit according to your preferences. When you get what you want, click on Select and Review (as in the image below).
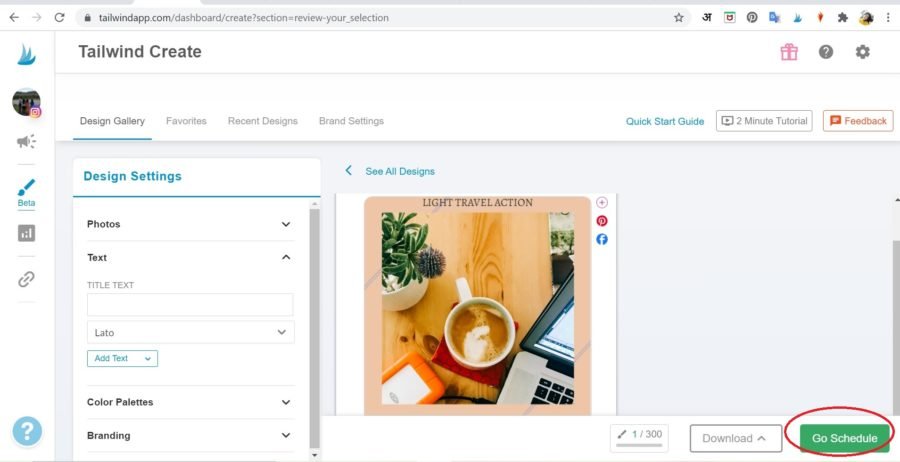
You can see your final design as it would appear. Click on ‘Go Schedule’ to schedule the design or ‘Download’ to download it.
You will see a message if you’re not already logged in into your Instagram account.
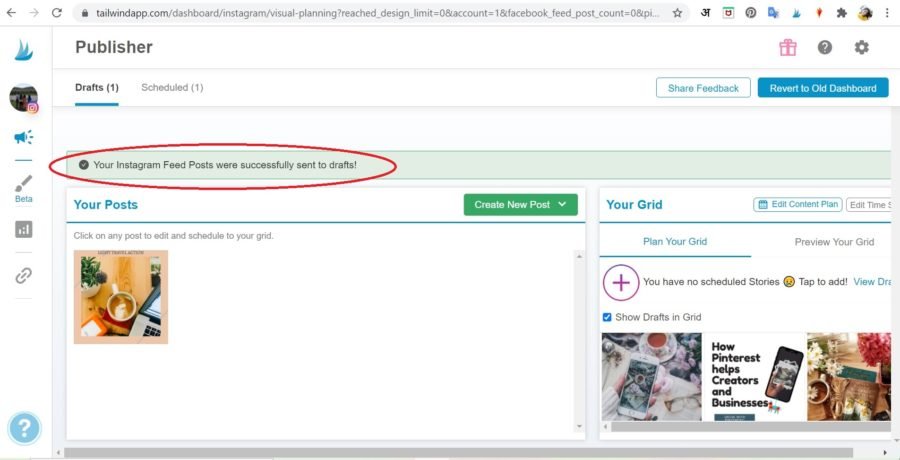
Click on Schedule and your will find your newly created design saved as a draft in Tailwind. Now you just need to add captions, hashtags and schedule the post.
For knowing more about scheduling the post on Instagram, skip a few paragraphs below and get to ‘ Captions and Hashtags’.
Creating and scheduling my social media content with Tailwind Create in batches help me stay stress free.
The time I save with Tailwind Create helps me focus on my work, be more productive and achieve my goals faster than before. Who doesn’t want a break in between work!
Here is the step by step guide for you to understand how to make use of Tailwind for Instagram posts.
Scheduling posts on tailwind for Instagram
Login into Tailwind (I’m assuming that you have linked your Instagram account with Tailwind already).
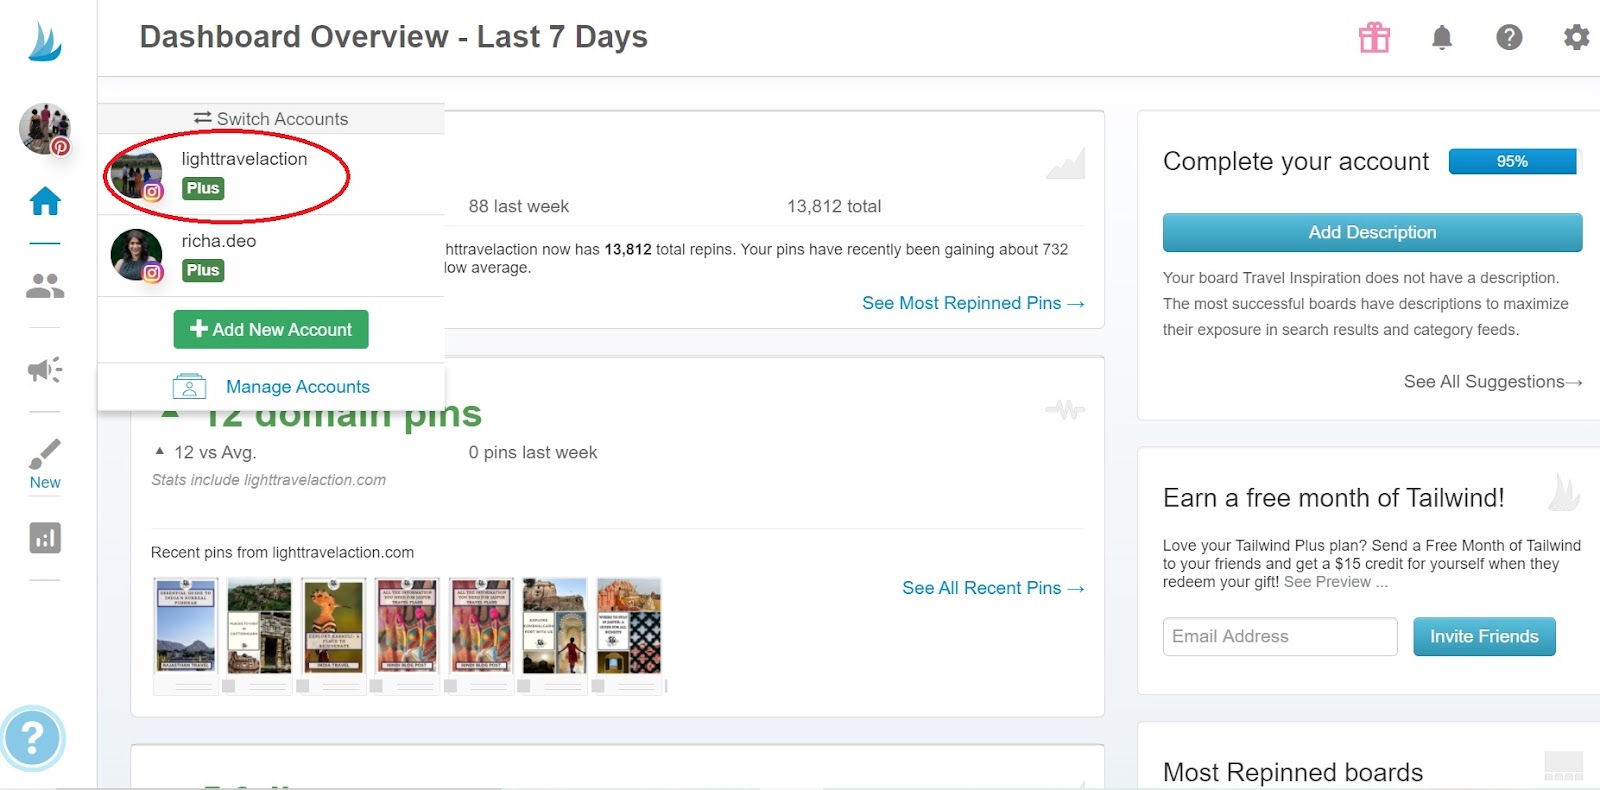
While you are on your dashboard, you can see your account icons on the extreme left. If you are using Pinterest, you can switch to Instagram by clicking on the profile image with Instagram logo.
You would be redirected to your Instagram Dashboard. On the extreme left column, you can see your account icon. Below that there are icons in the form of loudspeaker, graph bars and a pin for Publisher, Insights and Smart Bio respectively.
On the right side is Your Grid that displays your schedule for Instagram. Under ‘Plan Your Grid’, all the posts that you have previously scheduled and posted through Tailwind on Instagram would be shown here along with the posts that you have scheduled to be posted in future.
You can also see the slots with day and timing that are available where you can add some content.
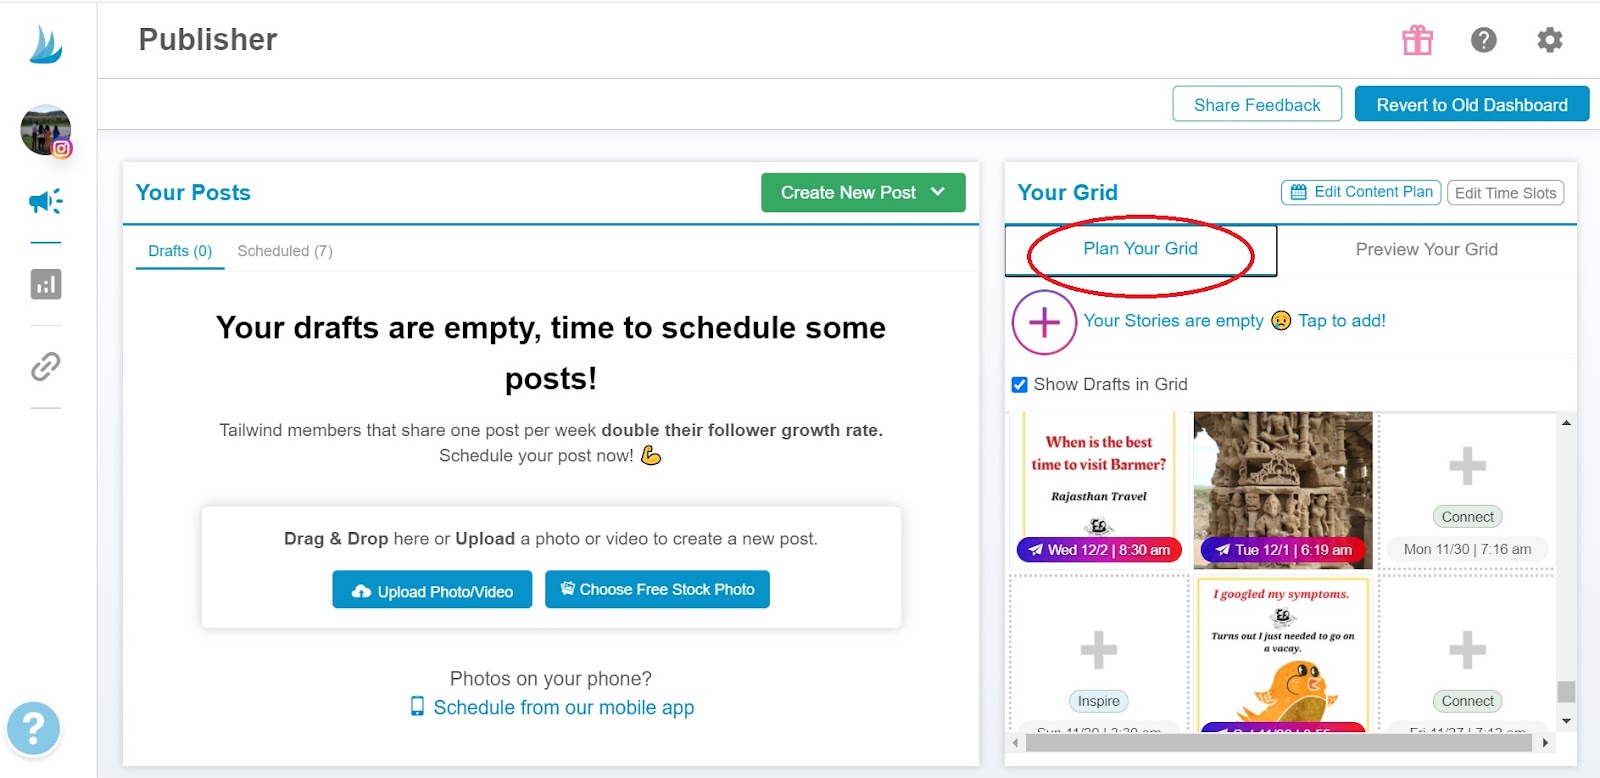
This is what I love about Tailwind- having it all in front of my eyes! I know how my grid appears and how the content that I have planned would appear on my Instagram account.
It helps sort out the mess that gets created in my head when I plan and schedule the content and decide what to post and when. And obviously, the best time is chosen by Tailwind for the slots so as to increase the reach and engagement on every post.
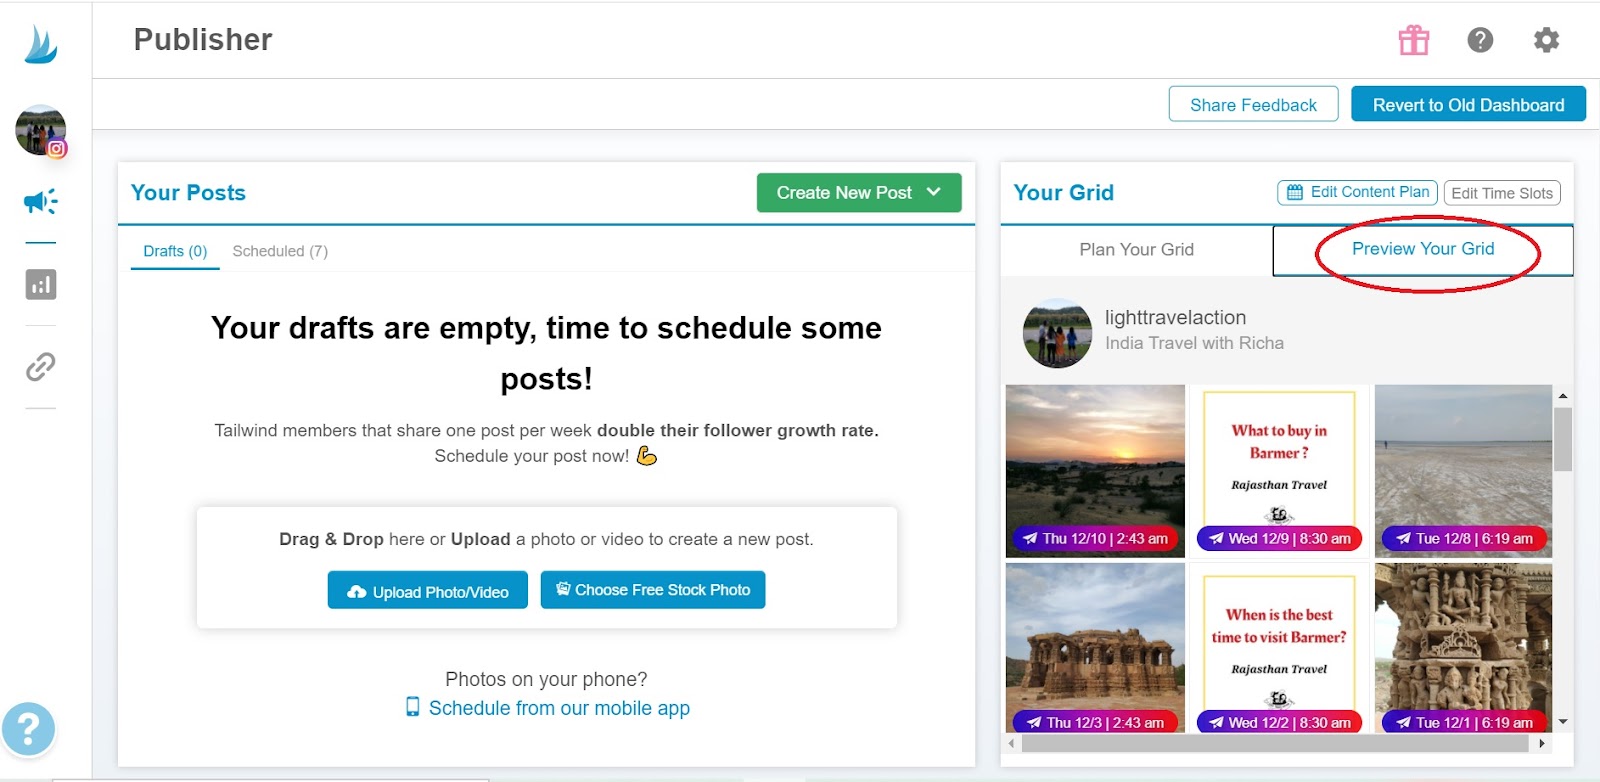
Under Preview Your Grid, you can have all the visuals of how your content scheduled to be posted in future would appear on your Instagram account. That’s a huge relief for me when I can see the (future) output right in front of my eyes and relax about it.
Creating Instagram posts on Tailwind
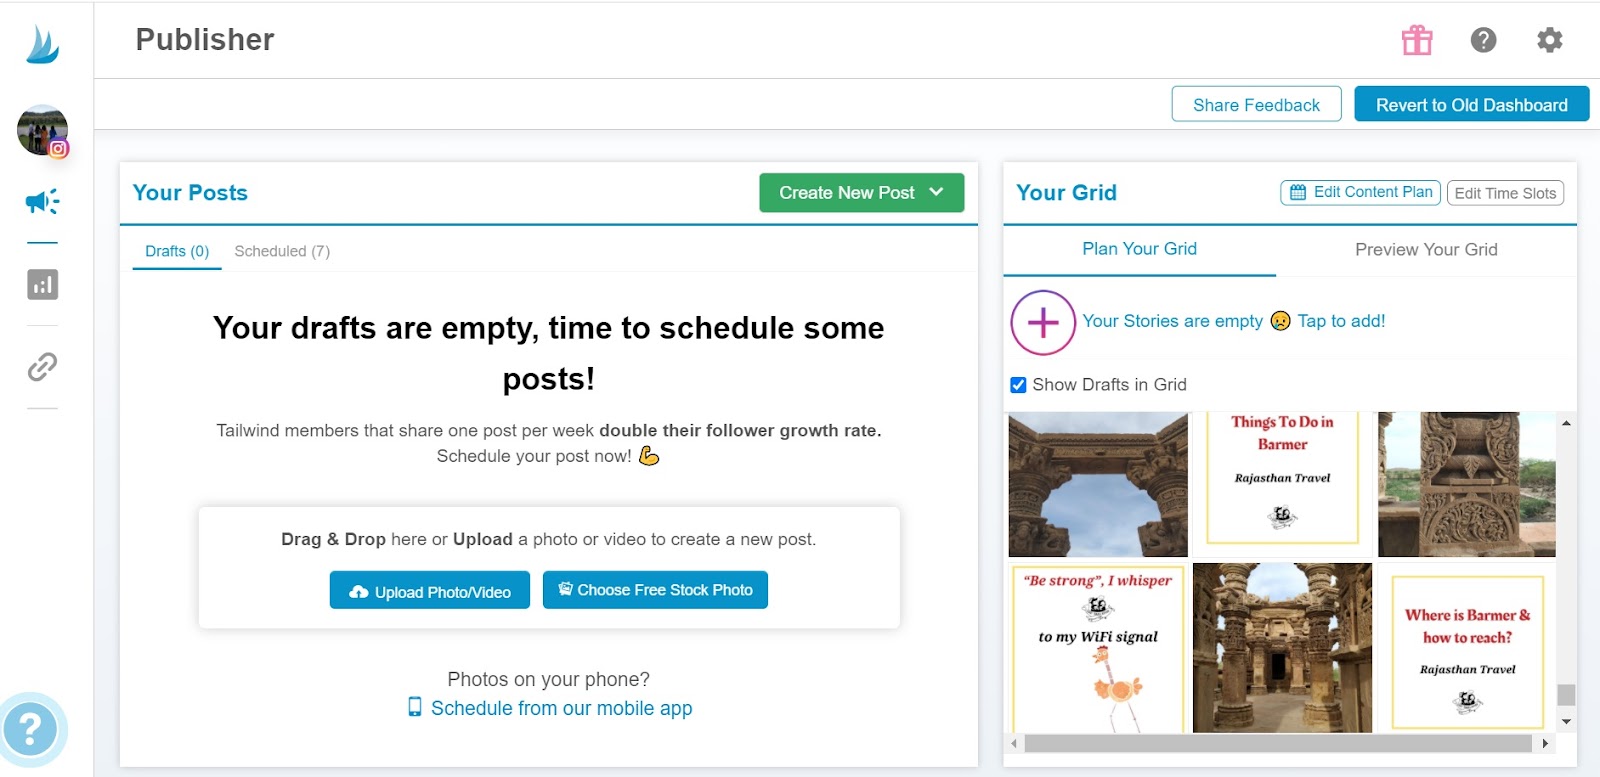
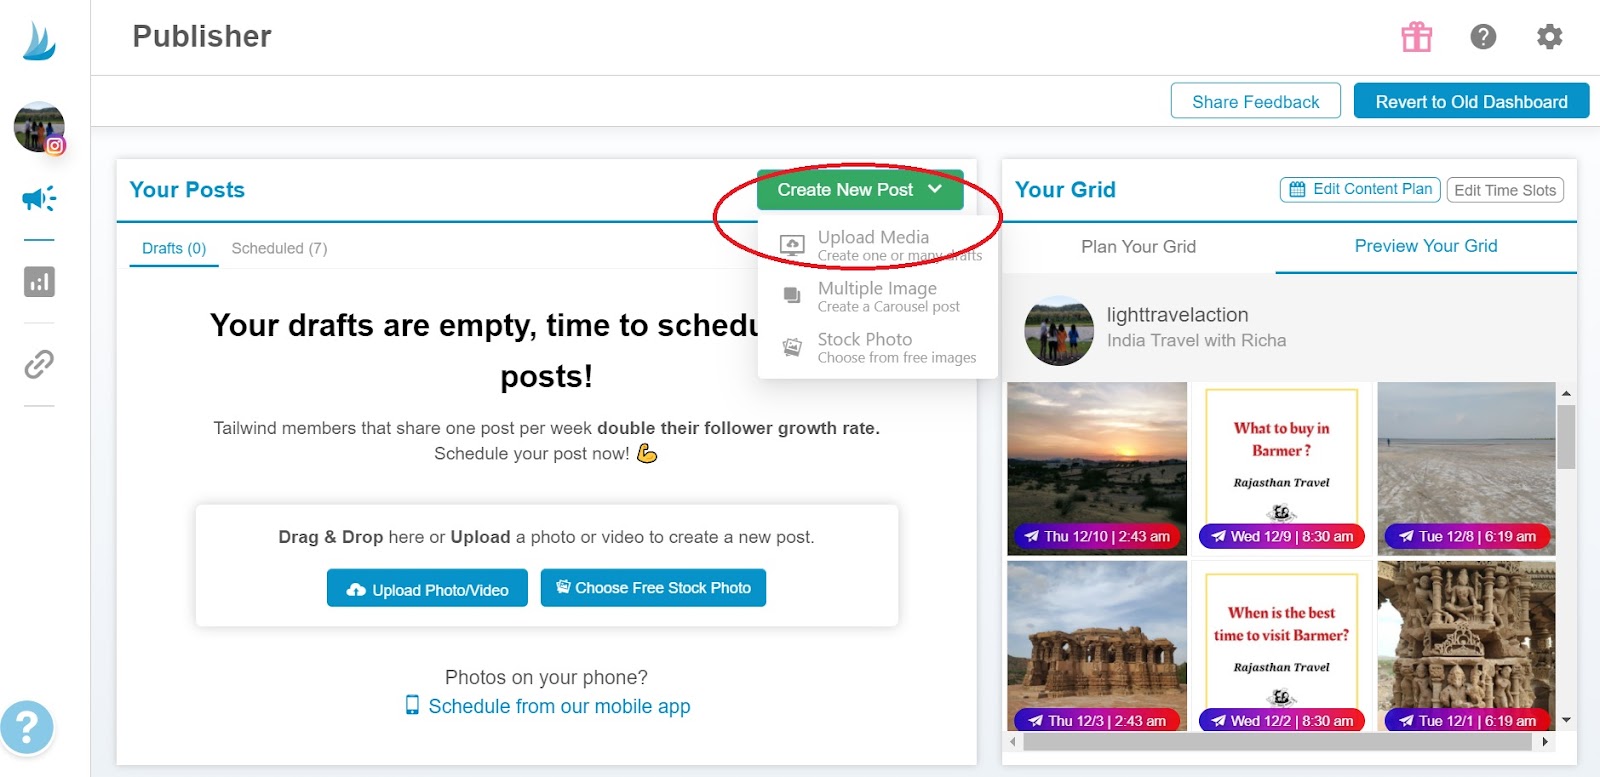
In the middle of the screen you can see your Drafts and Scheduled under ‘Your Posts’. Right next to ‘Your Post’ is ‘Create New Post’. You can click on this ‘Create New Post and upload media to create many drafts or choose free images from stock photos.
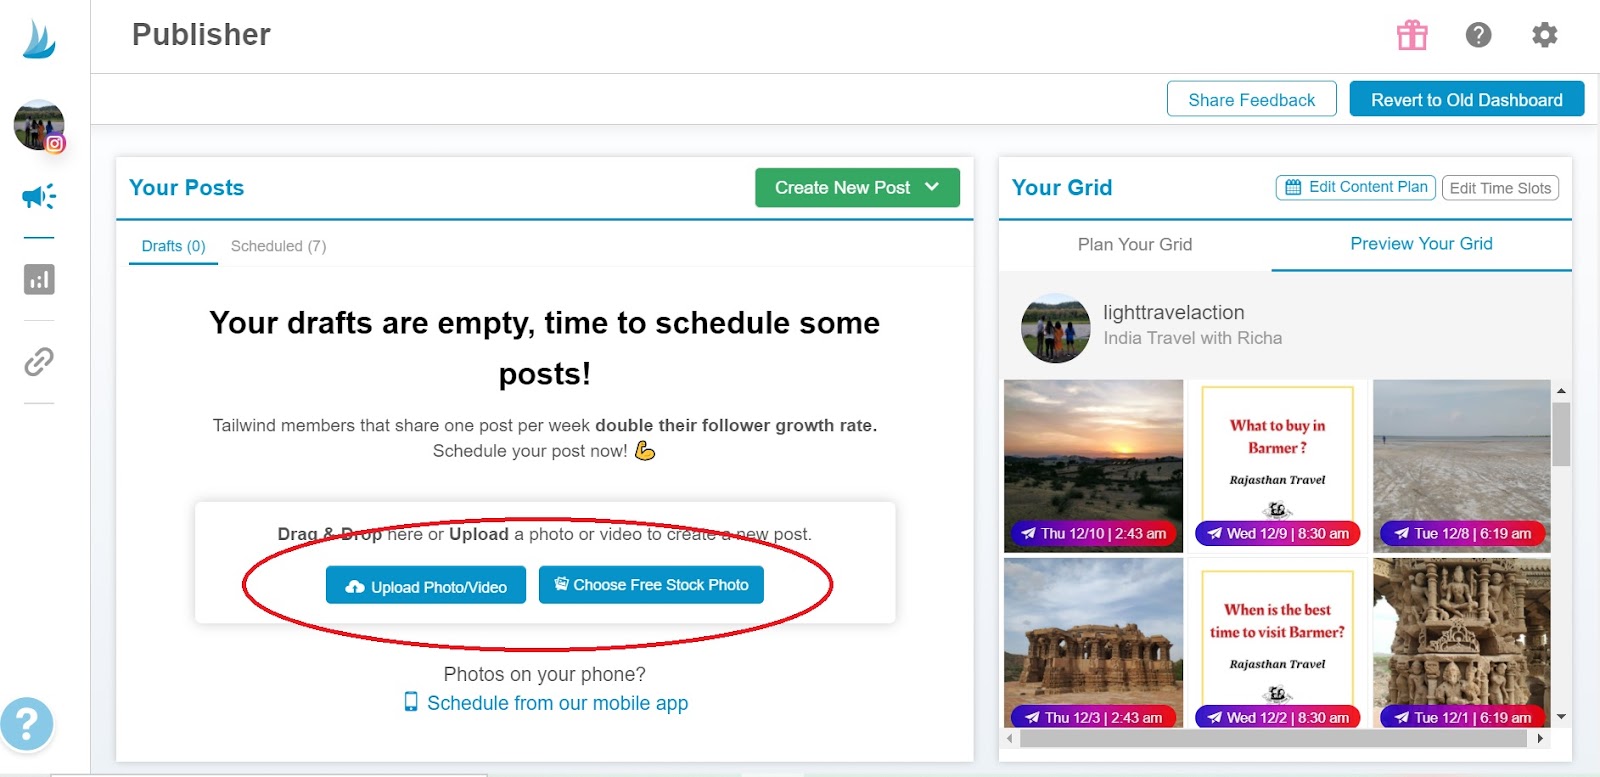
Alternatively, you can just click on the buttons- Upload Photo/video or Choose free stock photo and get started with your drafts.
Your chosen image or images would show under Drafts. Click on the image you want to edit or create an Instagram post of.
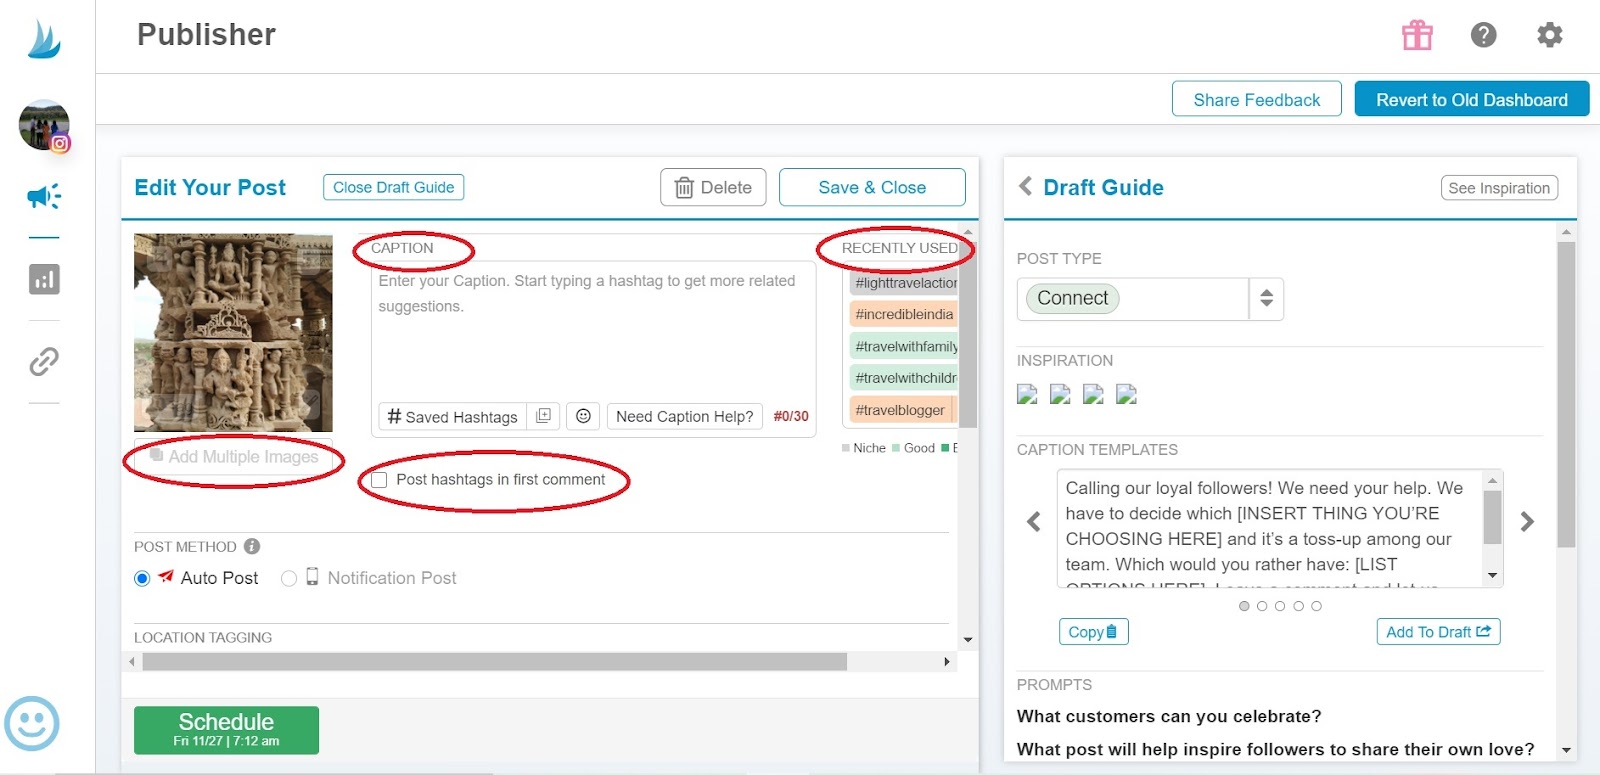
Caption and Hashtags
Draft Guide on the right side of the screen is there to help you in creating great captions for Instagram posts. Under Caption you have to enter your caption for the image. You can see recently used hashtags right next to Caption.
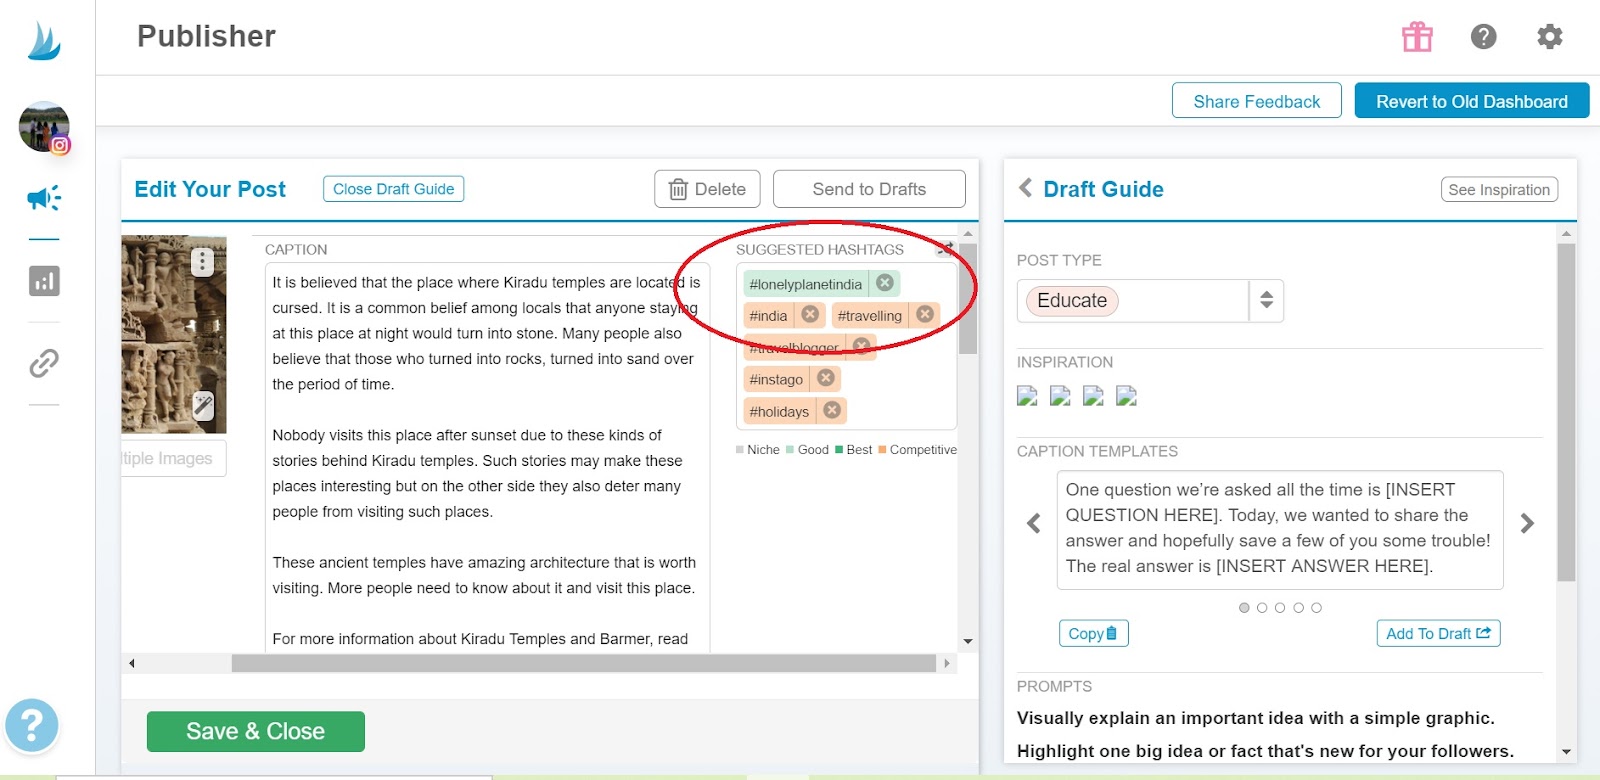
When you enter the caption, you would be shown the suggested hashtags highlighted in green, orange and grey color. Choose a mix of various hashtags from here if you haven’t already decided on the hashtags for the post.
If you want your post to have more than one image, you can click on ‘Add Multiple Images’ right below the image. Another interesting thing is the checkbox ‘Post hashtags in first comment’.
Earlier while posting an Instagram post I had to be very careful and quick about sharing the relevant hashtags in the first comment, seconds after posting. Not anymore!
Just one tick in this tiny box takes care of it.
The hashtags that you share in the caption are posted as the first comment automatically.
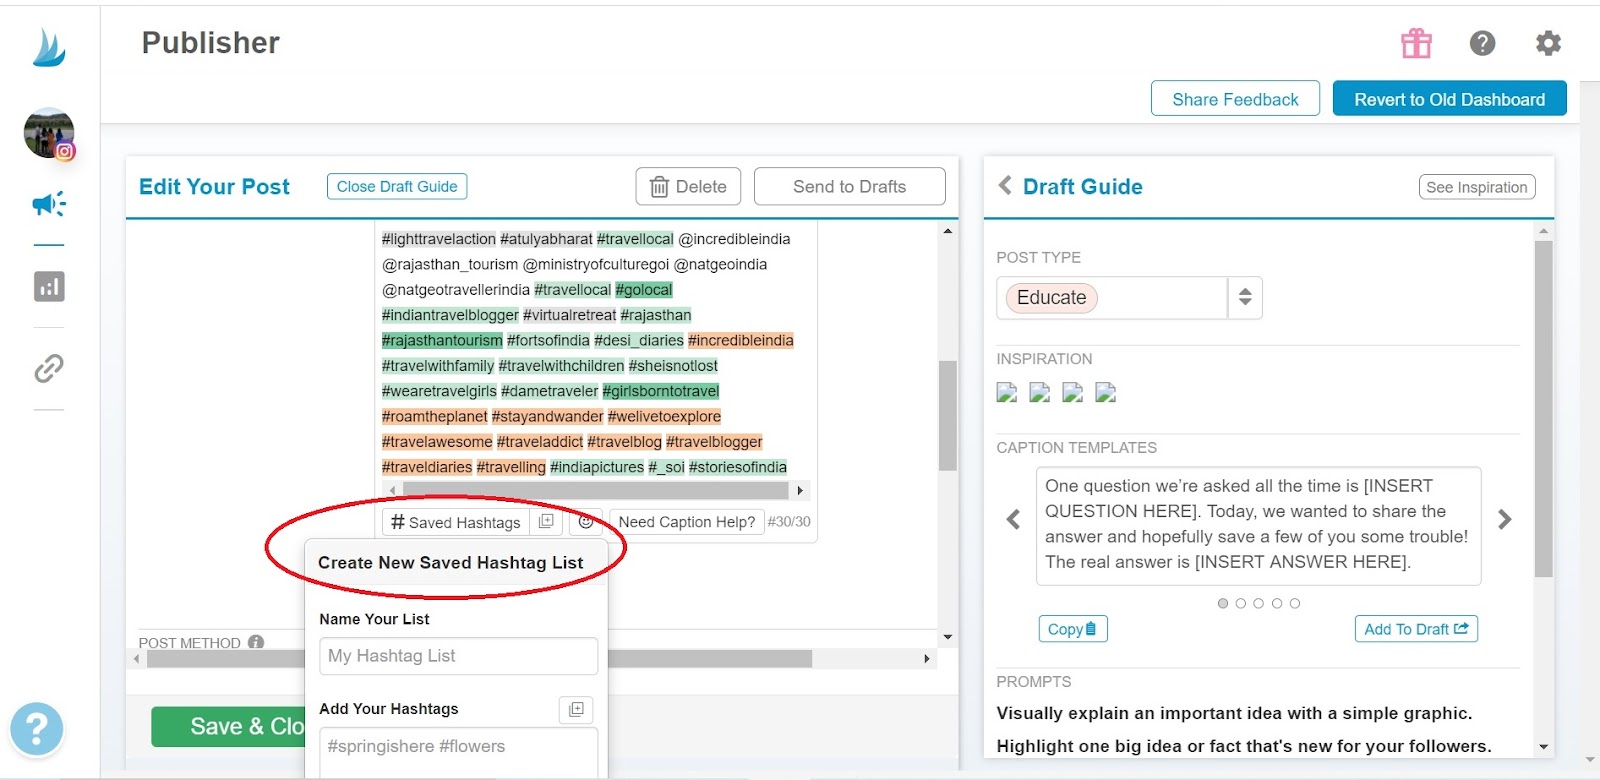
Copy pasting hashtags for each post seems like a huge task to me, not anymore! With the help of Saved Hashtag List, you can create a list and save hashtags that you use regularly.
Next time just click on Saved Hashtag List and voila! You are good to go!
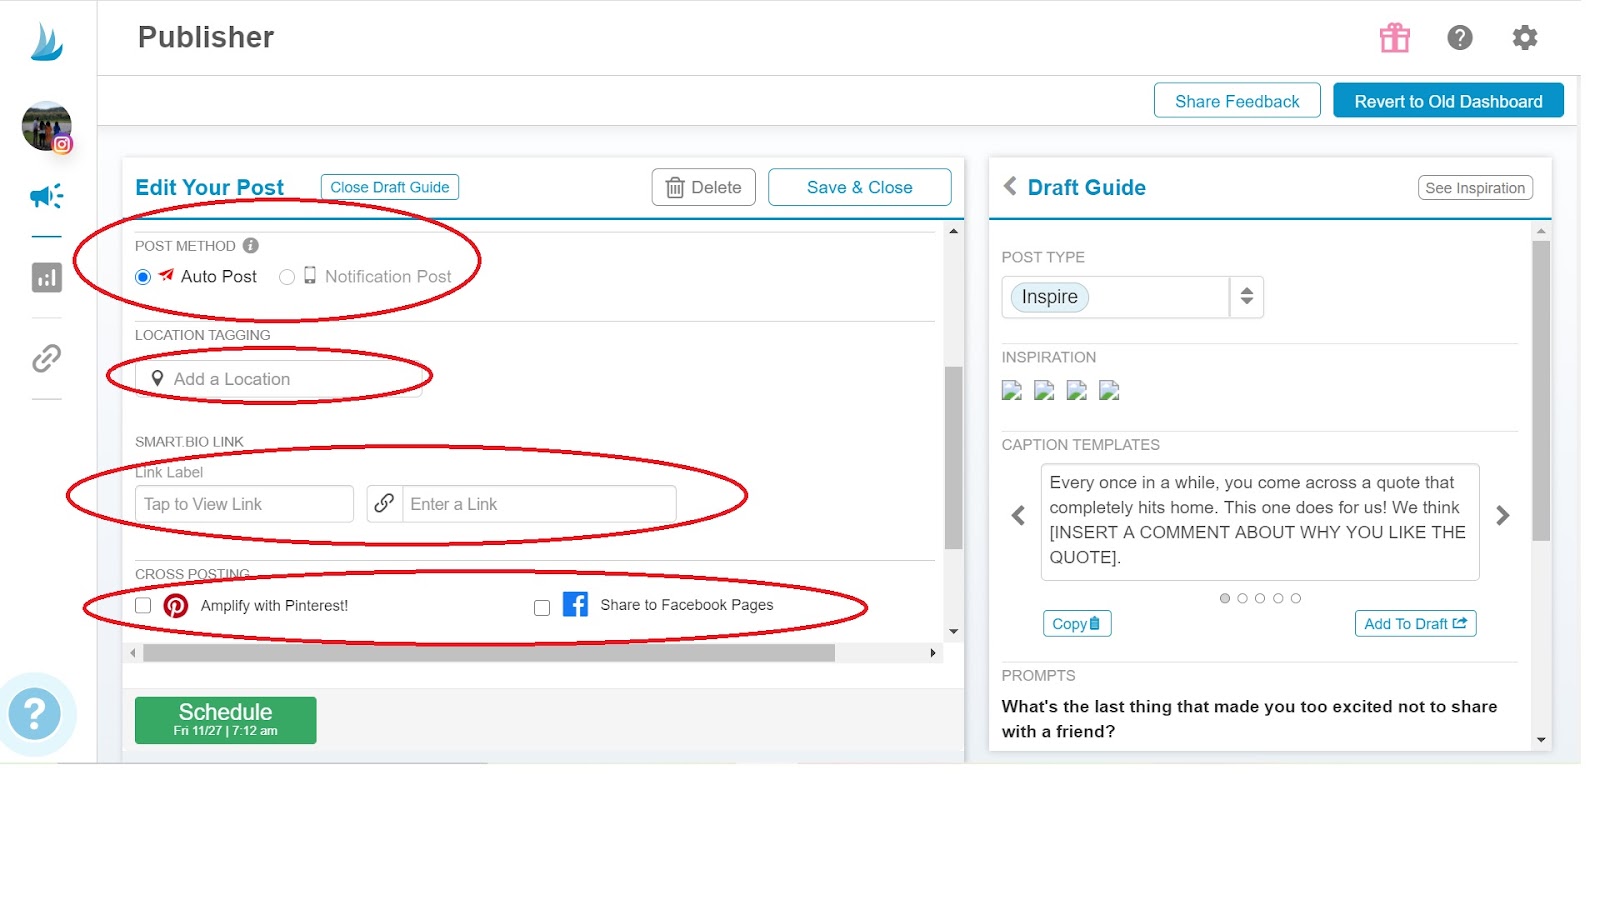
Post Method
The Post Method below the image has two options- Auto Post and Notification Post. In order to use the auto post method, you must have an Instagram business account.
It allows you to schedule and then automatically post your posts on the specified time. I use auto-post method for my posts.
Push notification can be used when you are using the Tailwind mobile app. It will give you a notification on your mobile app when it’s the time to post.
All you need to do is tap the notification and then follow the steps to open your post in Instagram app.
It’s quite obvious that the Auto post method is way more convenient and comes with features like posting hashtags in the first comment, selecting a location and cross posting on Facebook and Pinterest.
You can add location to Location Tagging if your post or image relates to a particular place. There’s space to add a link to a blog post or website if you want to.
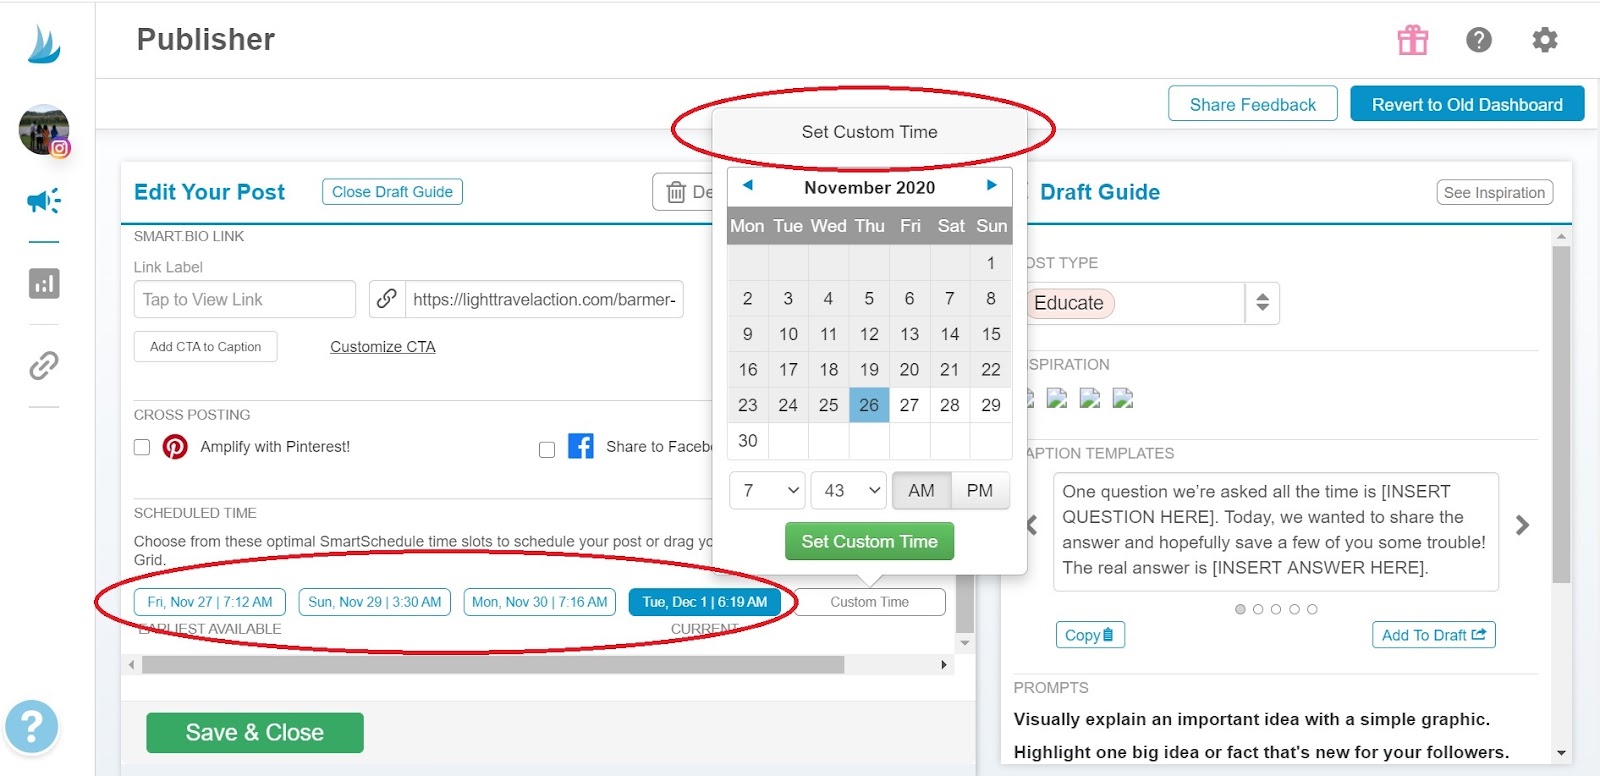
Now you are almost done. From Scheduled Time, you can select the slots shown or you can set a custom time for your post and schedule your post.
TAILWIND FOR INSTAGRAM STORIES
Now we are done with posts, let’s get into how to share stories on Instagram through Tailwind. You can not yet schedule stories to be automatically posted through Tailwind on Instagram.
You can create stories and then set up a time when you would receive a notification through Tailwind to share that story on Instagram.

Click on the Plus icon to add stories to your Instagram account. You can drag and drop the files or choose a file from your computer.
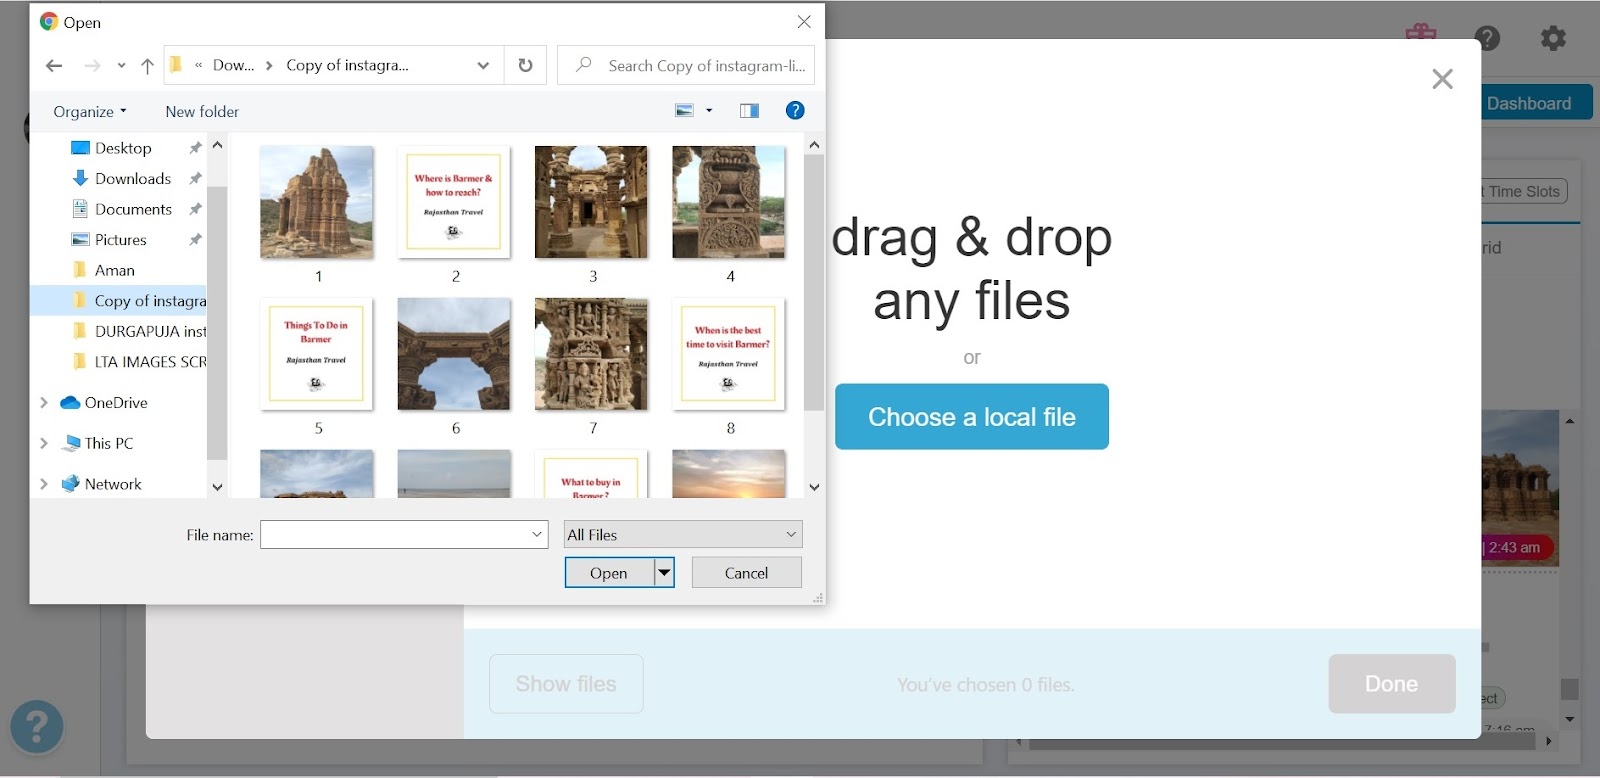
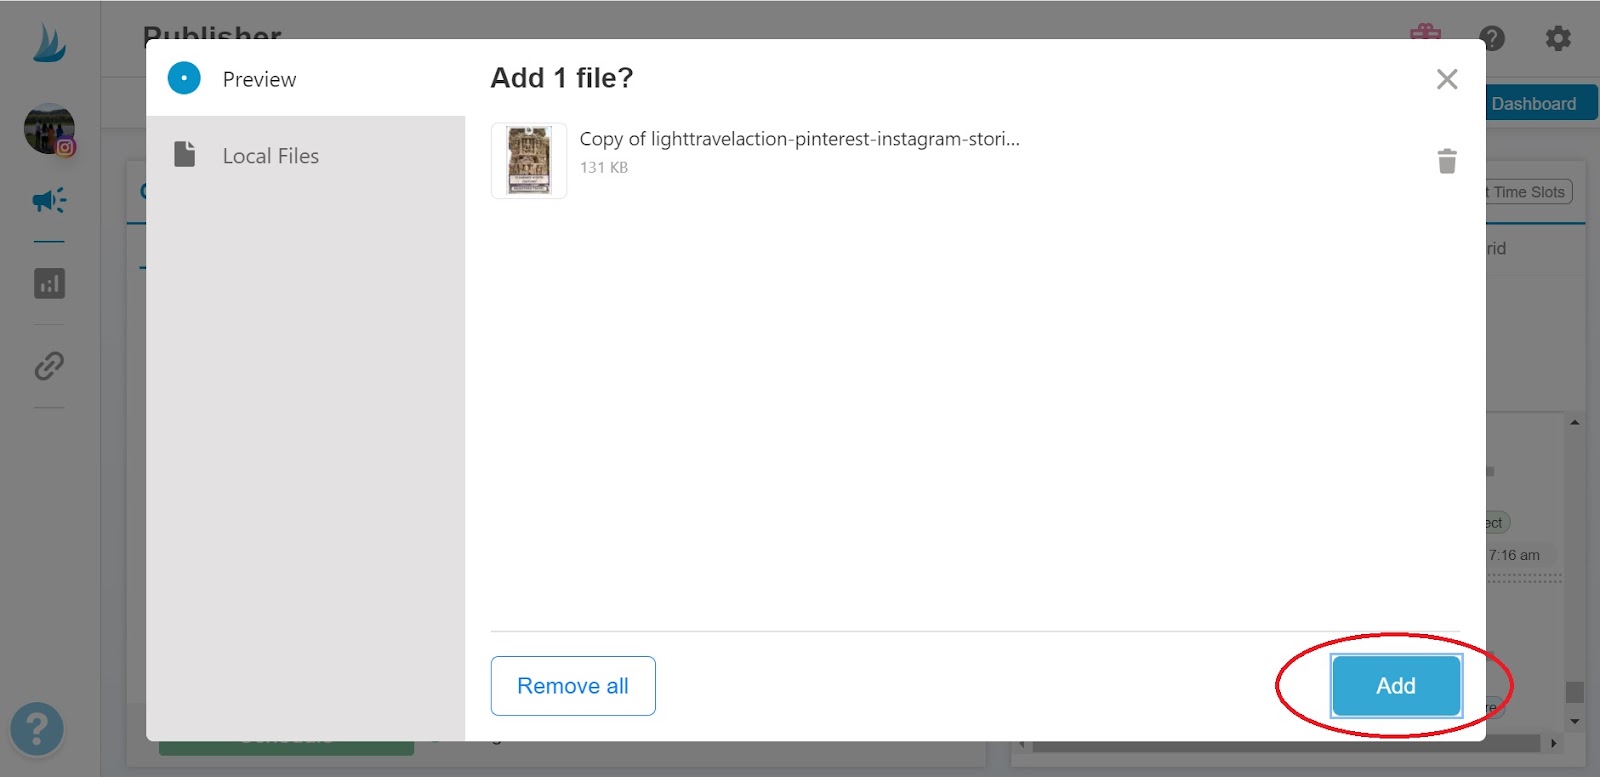
Choose the file that you want to put as an Instagram story and click on Add.
A new screen for stories drafts opens where you can create your stories.
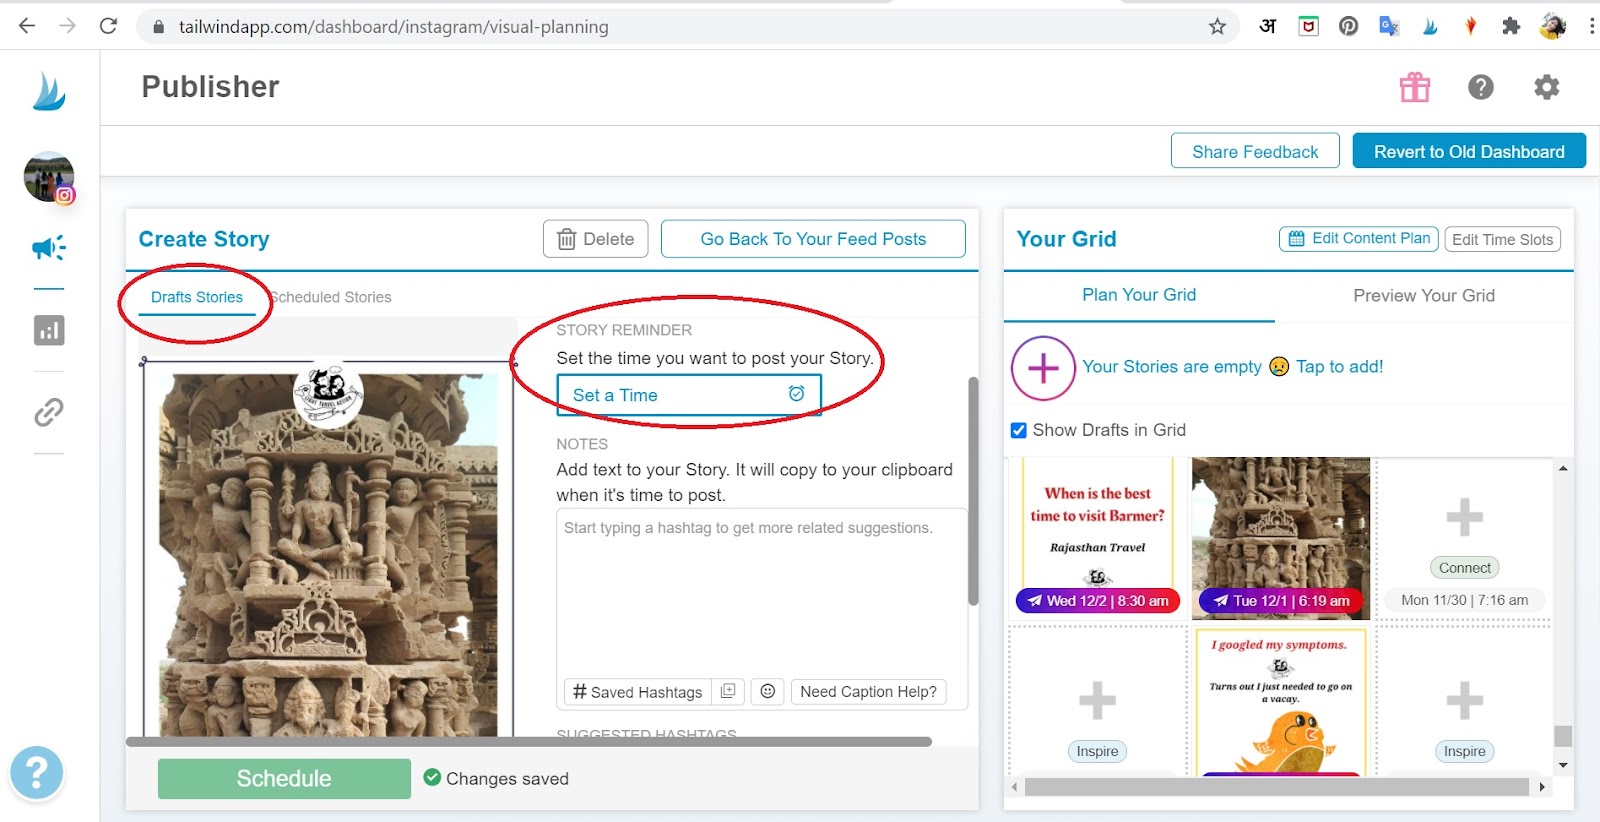
You set the time when you want to post the story and at that set time you receive a notification to post the story. In the Notes section, add text to your story. This text gets copied to your clipboard with the push notification.
When you are done with time setting, text and hashtags, click on Schedule. You will receive a notification on your Tailwind app to post the story. Open the notification and follow the easy steps to post the story on Instagram. You’re done!
If you are the person who likes to keep in all planned and scheduled in advance then you should use this to create your stories.
With Instagram posts and stories taken care of, Tailwind saves a lot of your time and effort which you can invest in creating better content.
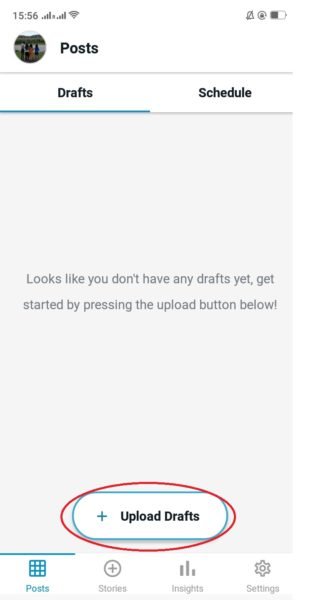
How do you schedule a post on Instagram mobile?
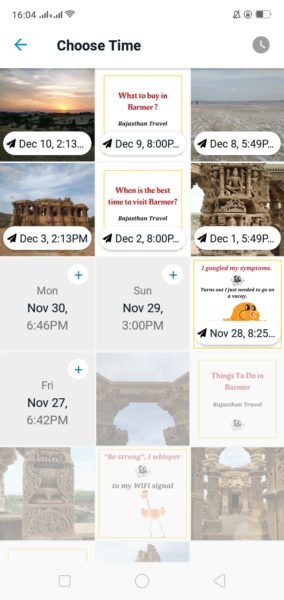
Install the Tailwind app and login into it with your Instagram credentials. You would see a screen as shown in the image below. ‘Drafts’ is where you create posts.
‘Schedule’ shows you your past and upcoming scheduled Instagram posts in the form of a grid. It also shows you the available time slots that would work best for you.
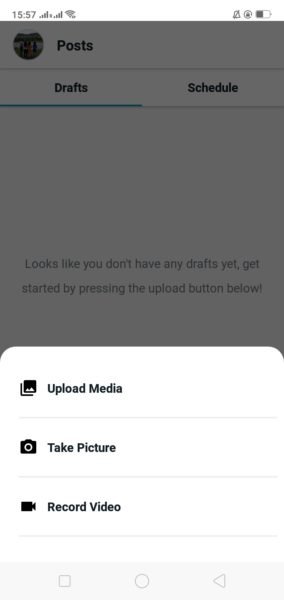
You can click on ‘Drafts’, upload media and choose the file you want to upload or take a picture/video.
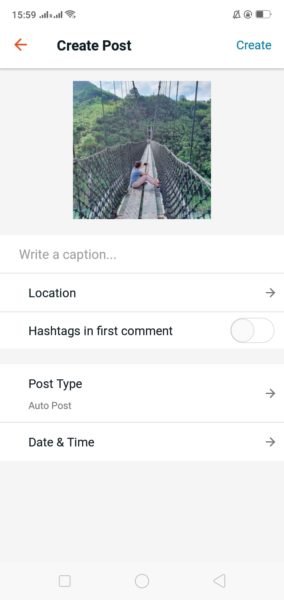
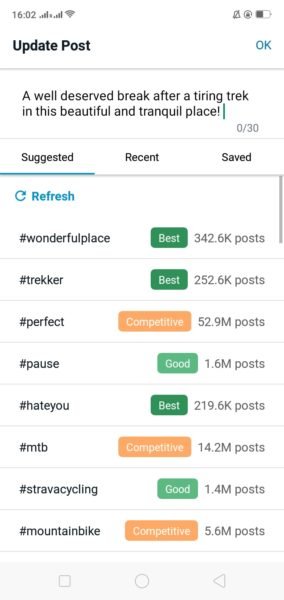
After you have selected a file (like I have selected an Image here), add caption, location, Post type. When you write the caption, suggested hashtags would appear under ‘Suggested’.
You can find recently used and saved hashtags under ‘Recent’ and ‘Saved’ respectively. The option to use Hashtags in the first comment is available here too.
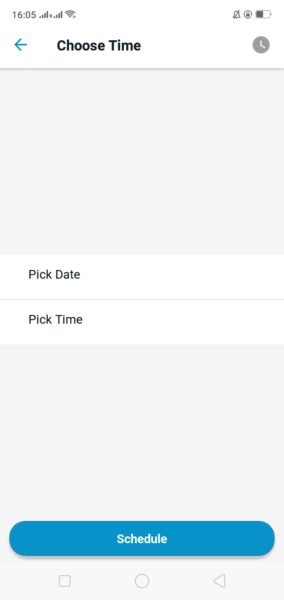
The steps in the mobile app are quite similar to the steps used in desktop. Pick a date and time to schedule the post. You can click on the time icon on the top right corner to set a custom time.
Click on ‘Schedule’ and that’s it!
I hope this step by step guide would help you understand better how to use Tailwind for Instagram. If there’s anything that I missed that you have learnt from using Tailwind, do share in the comments!
Click here to start your free Tailwind account.
Frequently Asked Questions
Does Instagram allow scheduled posts?
Of course it does! I use Tailwind to schedule posts on Instagram. It is a huge relief to create the content for a period of time in one go and you are sorted for a week or a month (that’s up to you)!
How often should I post on Instagram?
According to what I have observed, posting consistently is very important to keep your followers active and engaged. Posting one post every day is great if you can do that otherwise posting at least 4 to 5 posts a week is good too. You should be consistent with your posts and provide value to your followers through your post.